
I decided to make HDR this month’s themed series, while including a little “show and learn.” I will continue with more artistic series again next month but do hope to include occasional education series throughout the year. And just so you know, there are still some nice photos to check out in this post 🙂
Below are some examples of nighttime, daytime, and interior HDR images, along with explanations for those interested in trying HDR photography themselves.
I’m still learning this technique myself, so I hope the information helps. If you have any questions, feel free to ask me.
All photos are taken by me.
Website: www.BuuckPhotography.com
Facebook: www.facebook.com/BuuckPhotography
In HDR photography, at least 2 images are needed, preferably 3. What we are doing is taking images with varying exposures and letting the software choose the “properly” exposed portions of each of those images, combining the parts into a final balanced image. HDR stands for “high dynamic range,” meaning a greater range of luminosity (or brightness values).
With the combination of the multiple images, we are allowed a range of light covering the dark & bright areas and everything between. In essence, we now have more workable areas of the photo, because in comparison with just a single image, the bright or dark areas are not so overdone to the point where editing cannot bring details back. A photo that is exceedingly overexposed or underexposed will never be able to be fixed with editing, because any information recorded from the scene was lost in the over/underexposure – the camera now has only pure white or black information stored instead.
The next couple images will help visually explain what I have described above.
Below is an example of an HDR photo taken during the day.
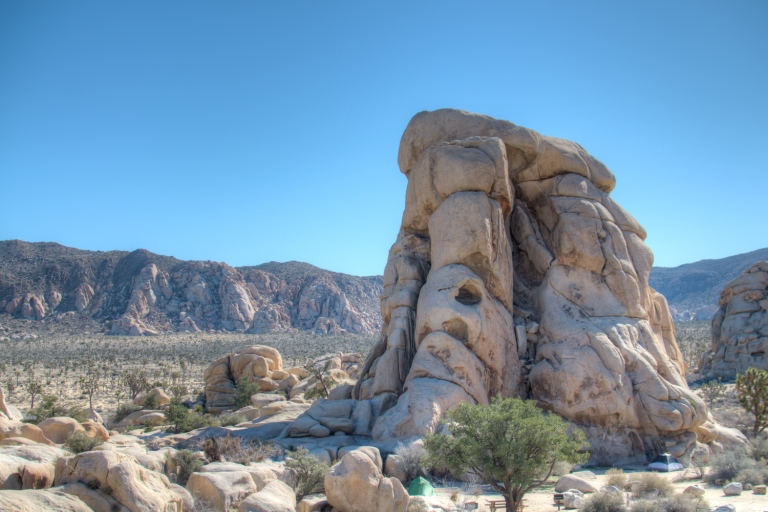
Below are the three original images that were combined to create the HDR image above. The goal I was aiming for was a photo with softer shadows, so that the rock’s details would be more visible.
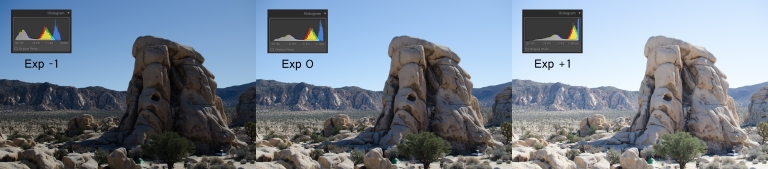
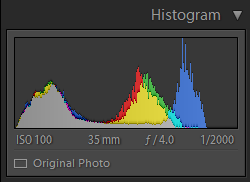
In the first (left) image, the photo is underexposed. It was shot with a 1/2000th shutter speed. The shadows of the rock are darker than we want, but the blue sky is decently exposed. As we see on the histogram (below), the information recorded roughly ends at the 80% brightest region (the far right of the graph is empty, meaning that no information is recorded in the bright values – i.e. the photo has no bright areas).
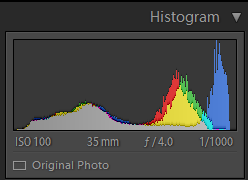
In the second (center) image, the photo is exposed pretty nicely. It was shot with a 1/1000th shutter speed. In all honesty, we could do just fine with this image alone, but I wanted to play around with HDR on this image to soften the rock’s shadow. As you’ll see in the histogram (below), the graph is mostly balanced, with only few parts of the photo being too dark or too bright (the graph ends just before the far left and far right).
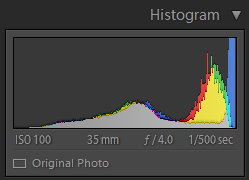
In the third (right) image, the photo is overexposed. It was shot with a 1/500th shutter speed. The sky is too bright, but the shadows are now bright enough to see the details of the rock. In the histogram (below), we see that the image is mostly bright, with almost no information recorded on the dark end (left 20%).
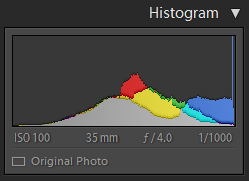
Combining these photos we have a final image with a more balanced range of brightness. In the histogram (below) of the HDR image, we see that the graph has fewer “spikes” and that most information (thickest part) is towards the center, where we want it. There is very little information on the left (dark) side, as those dark areas were replaced by a brighter version from the 1/500th image. There is also less information on the right (bright) side, as those areas were replaced by the darker version from the 1/2000th image. That said, there still is a little spike on the right, indicating that some of the blue is still quite bright, but it is now a more isolated portion than we had see in “second” nicely exposed image.
A few things to note when taking your bracketed photos (multiple exposures):
- A tripod was used to minimize any movement. That way the images overlap properly.
- I kept my ISO (100) and aperture (f/4.0) constant.
- I only adjusted the shutter speed, utilizing 1 stop intervals (1/2000th -> 1/1000th -> 1/500th). You’ll want a minimum of 1 stop between images to allow enough change in the image brightness. Also, larger gaps, like 3 stops, can make it difficult for the software to blend. The gradient between bright and dark now has a minimum 3 stop gap to cover, which could leave to unnatural borders around objects (almost a spray paint sort of look). My advice is to photograph every stop from the darkest to brightest images you desire.
- The histogram has colors indicating how bright or dark certain colors are. A color can actually end up on both ends of the graph if there are, for example, both dark and bright areas of the color blue.
Below is an example of HDR making a big improvement. The histogram and photo on the left has both underexposed (right) and overexposed (left) areas. In this case, the underexposed areas were walls and the overexposed areas were the windows. An HDR using 7 images, at 1 stop exposures, created the histogram and photo on the left, nicely balanced.


To combine these photos, special software is required. For my HDR images, I use Photomatix: http://www.hdrsoft.com/ (photoshop can be used as well – haven’t done it myself though). In Photomatix, I upload the bracketed photos (term for the multiple exposures) and let the program automatically put them together.
Steps:
- Click “load bracketed photos”
- Click “browse” to select the photos and select the files. Keep in mind to only choose the images need to create 1 final HDR image. i.e. you can only do one HDR image at a time (multiple HDR images requires the “batch bracketed photos” option).
- Once the images appear in the box, click “ok”
- A new box appears. Select your settings.
- I select “align images.”
- Be sure to check if you used a tripod or handheld.
- If objects in the scene moved (like a person or blowing flag), you may want to check “show options to remove ghosts.” I find this option limited in fixing any issues, but it’s worth a try.
- I select “reduce noise on all source images” and leave it at 100%. I don’t really know if it helps, but my theory is the “reduced noise” option will help prevent some graininess in my photo. I bet it’s more relevant if you had taken a photo at a high ISO 1600+, but I stick with ISO 100 for HDR.
- Select “reduce chromatic aberrations” if there was a lot of contrast in the image (very bright regions bordering dark regions, especially a dark foreground object with a bright background). Such brighly, contrasted images will likely create a green or purple border (called chromatic aberration) at the edge of the very bright areas, where that bright light spills into the dark area. An example of chromatic abberation: https://www.fototripper.com/wp-content/uploads/2013/12/chromatic-aberration.jpg
- I don’t mess with the “raw conversion settings.”
- Click “merge to HDR”
- Your HDR image will be shown and you can move the slider settings on the left to fine tune it or try the presets on the right.
- When you’re happy with the results, click “apply”
- A final image will be rendered and click “save final image.”
Photomatix produces an image that can further edited or saved as is. They even offer various blends (presets). By clicking on the presets, you can really change the appearance of your image, from a more painting like feeling to something more natural. To be honest, I don’t do much in Photomatix apart from combining the images, because the software is a bit limited in its fine tuning.
Since the HDR software only does so much, I go on to further post process my photos in Adobe Lightroom: http://www.adobe.com/products/photoshop-lightroom.html
More examples of HDR images below.
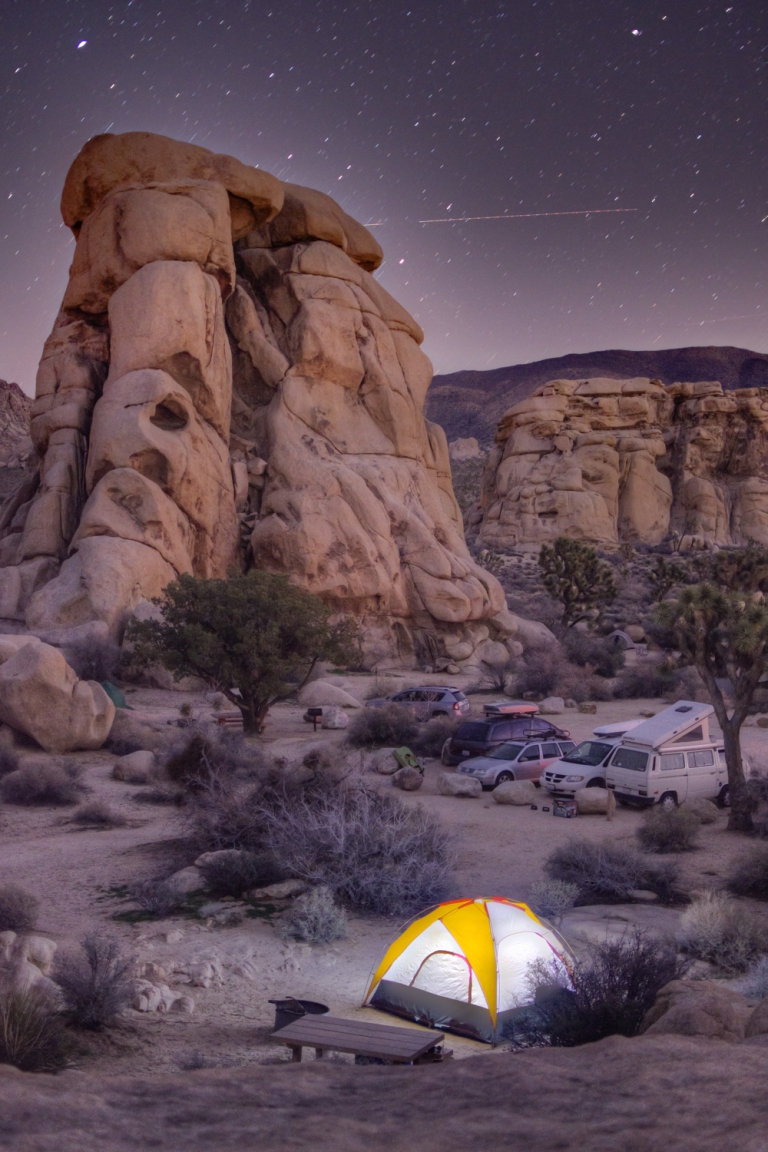
Below, the night was so dark that I needed long exposure to brighten the rocks, but that created a problem with the tent – it became outrageously bright! I could’ve turned off the tent light, which would’ve made it just as dark as the rocks and therefore properly exposed as well. But I wanted to have the tent glowing for the aesthetic, so HDR was used to give me that flexibility.
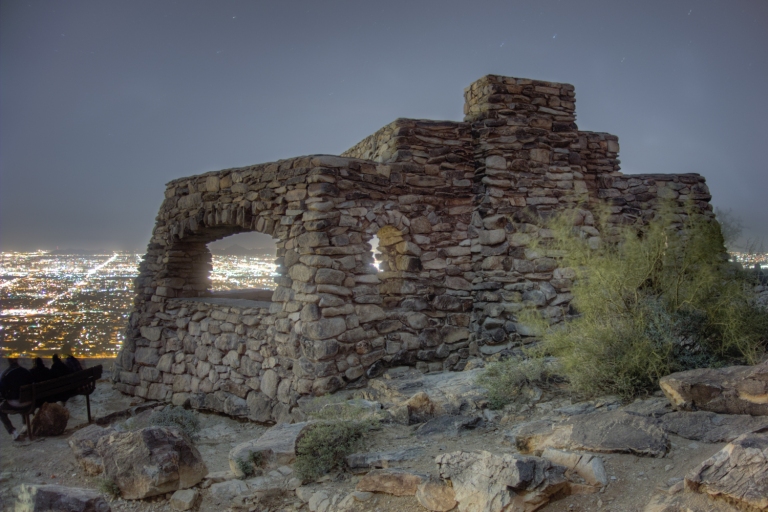
Below, the lookout was pitch black in comparison to the city lights. Any properly exposed photo of the building would’ve had the city lights so bright that one might think the photo would catch fire, haha! So I used HDR to give myself a nicely lit lookout while preserving the city lights.
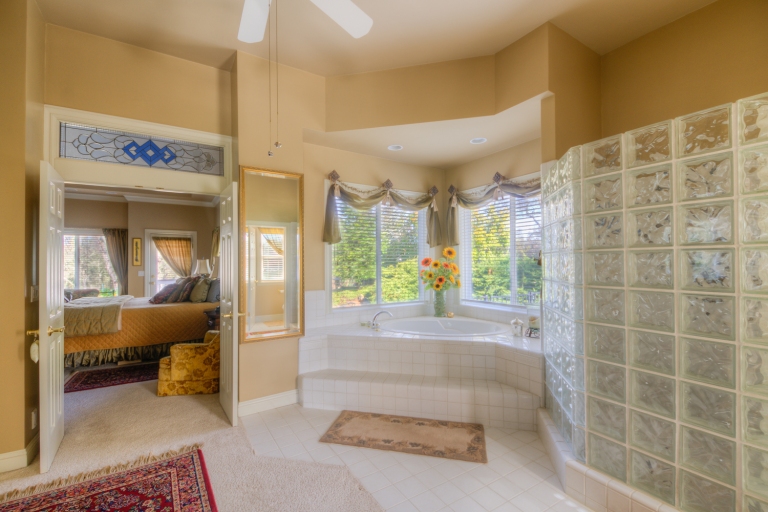
Below, HDR was used to reduce contrast and allow the view outside the window to come in. In an ordinary photo, the windows would’ve been so bright that we would have no idea that nice landscaping was just outside.
I hope you found this information helpful, as I hope to post more educational series in the future.
For my HDR images, I use Photomatix: http://www.hdrsoft.com/
And post processing is done with Adobe Lightroom: http://www.adobe.com/products/photoshop-lightroom.html
-Michael, Buuck Photography

Perhaps it’s me, but it wasn’t obvious in your article HOW to combine the photos to create HDR. I am seeing some cameras and smart phones with an “auto” HDR setting, but I’m still wondering how I have seen some HDR photos that look almost 3D because of the contrast and details that would normally be lost, like your wonderful photos. What a difference HDR makes, but HOW does one do it? Need special software? Does LR do it and I just haven’t noticed the setting?
LikeLike
Very good point! I had barely mentioned the software at the very end (as an afterthought), but it’s important to discuss the mechanics of merging the images taken. So I went ahead and added a paragraph discussing the use of software – Photomatix. It’s now just after the Histogram section.
I think there is a setting in Photoshop to do merge to HDR in lightroom. Haven’t done it myself.
Thanks for the comment, it’s good to see some improvement with my post 🙂
LikeLike